Are you experiencing restricted connectivity with Wi-Fi for your Android telephone and searching for an answer? Don’t fear; now we have researched this matter and advanced some fixes to unravel your downside. The web has transform crucial a part of our lives in each box, whether or not for workplace paintings, enjoyable at house, or paying attention to songs whilst touring. We want web get right of entry to in every single place.
After we have been researching this matter, we spotted that there are already a large number of articles to be had on the net however no longer they all are informative. Right here now we have examined answers for you; with those fixes, you’ll be able to resolve this downside and benefit from the web with out interruption. Let’s see what the ones Wi-Fi displaying restricted connectivity fixes are and find out how to do them.
What does Restricted Wi-Fi Connectivity imply?
Contents
- 1 What does Restricted Wi-Fi Connectivity imply?
- 2 Easiest Tactics to Repair Wi-Fi Appearing Restricted Connectivity in Android
- 3 1. Test Wi-Fi Community
- 4 2. Restart Your Tool
- 5 3. Overlook and Reconnect Wi-Fi Community
- 6 4. Test the Date and Time
- 7 5. Disable VPN
- 8 6. Alternate IP Settings
- 9 7. Use the Proper IP Cope with
- 10 8. Reset Community Settings
- 11 Conclusion
Virtually everybody faces this downside often of their day by day existence. In case your Wi-Fi is displaying restricted connectivity or a wake-up call at the Wi-Fi icon, it signifies that your android telephone is hooked up on your Wi-Fi, however the web isn’t hooked up correctly with Wi-Fi.
Easiest Tactics to Repair Wi-Fi Appearing Restricted Connectivity in Android
Above, we knowledgeable you in regards to the restricted Wi-Fi connectivity error factor. Now, take a look at our checklist of fixes for this factor. We are hoping that once studying those fixes, you’ll be able to unravel your downside simply.
1. Test Wi-Fi Community
To start with, you will have to take a look at whether or not your Wi-Fi community is operating correctly. Attach your Wi-Fi to every other Android software and take a look at in case your Wi-Fi is operating on that software or no longer. If the Wi-Fi is operating on that software, then the problem could also be with your personal software.
You’ll check out our different the best way to unravel the problem. On the other hand, if Wi-Fi continues to be no longer operating on different gadgets, touch your Web carrier supplier for additional help.
2. Restart Your Tool
As mentioned in a lot of our articles, restarting is a fundamental and efficient answer for random mistakes. so restart your telephone and your router, Flip off the router for 30 seconds, after which flip it again on. If it’s some roughly glitch, then restarting the software will resolve the issue; if it’s nonetheless there, check out every other way.
3. Overlook and Reconnect Wi-Fi Community
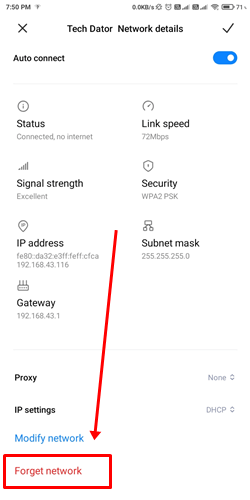
Forgetting the Wi-Fi community can resolve this downside as it shops the community knowledge for long run automated connections after we attach our telephone to Wi-Fi. However from time to time, the Wi-Fi knowledge saved on our telephones may also be corrupt or old-fashioned and it will motive issues. To mend this downside, observe the stairs underneath.
- Move to the Telephone Settings and make a choice Wi-Fi or long-press the Wi-Fi icon to get right of entry to the Wi-Fi Settings immediately.

- Make a selection the community this is inflicting a topic.
- Click on on Overlook Community.
- Now reconnect with the Wi-Fi community once more.
4. Test the Date and Time
Sure, this can be a reason why for this downside, so ensure that the Date and Time for your telephone are right kind. In case your telephone’s date and time are faulty and the time zone is unsuitable, observe those steps to replace your telephone’s time zone to the present one.
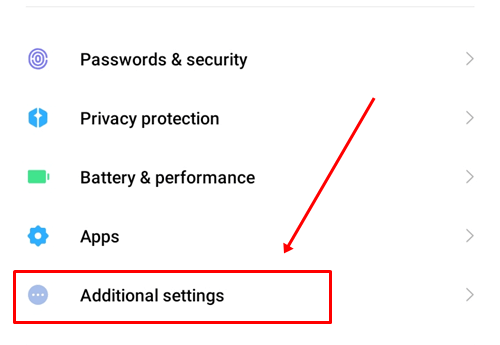
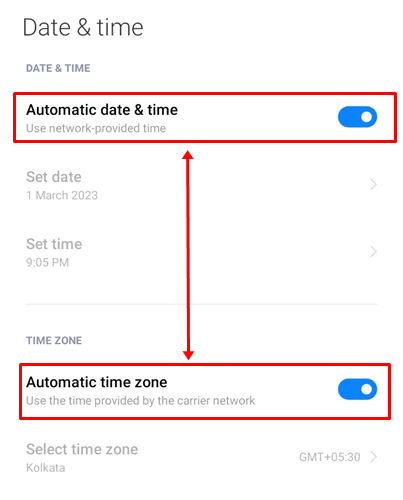
- Open your telephone’s Settings and make a choice Further Settings.
- Faucet on Date & Time.
- Now Transfer at the toggle button for Automated Date & Time and Automated Time Zone.
5. Disable VPN
If you happen to use a VPN to get right of entry to blocked websites or limited video games, disable it now and check out getting access to the Web. VPN offers you a personal server, which will from time to time hinder the web. So in case you are dealing with this factor whilst the use of VPN then exchange your VPN server or disable it.
6. Alternate IP Settings
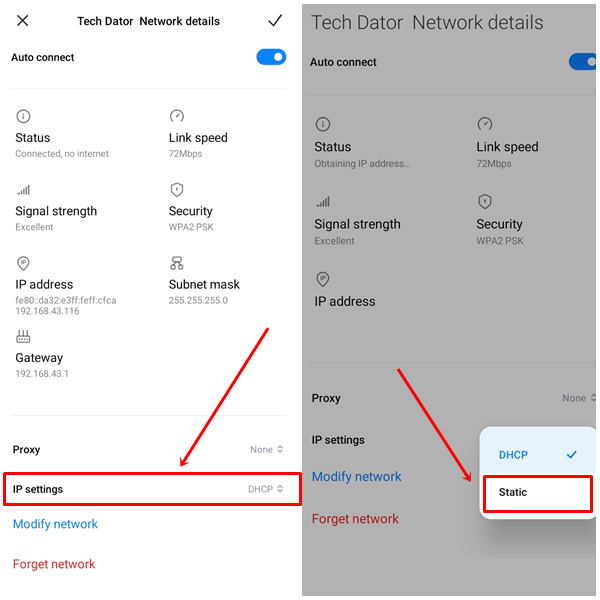
In IP settings, you will have two choices first one is DHCP and the second is Static. You’ll exchange your settings between them to unravel this Wi-Fi-limited connectivity factor. In case your present environment is about to DHCP, then exchange to static; whether it is static, then exchange to DHCP. Apply those steps to switch the IP settings.
- Move to Settings > Wi-Fi and make a choice the community. You’ll see those steps in our 3rd way above.
- Now tab on IP Settings and make a choice Static.
7. Use the Proper IP Cope with
If in case you have modified your IP environment from DHCP to static and are nonetheless dealing with the problem, take a look at your IP cope with. This can be a uncommon state of affairs, but when for this reason you might be dealing with WiFi-limited connectivity then you must exchange your IP cope with.
The IP cope with of each telephone and WiFi will have to be in the similar vary. Whilst you modified the IP settings to static then you definitely will have to have observed new choices like Gateway and DNS.
- The primary 3 digits (192.168.1.x) of the IP cope with are at all times the similar on each community. You’ll change x with any quantity between 1 to 255.
- For the gateway IP cope with, You’ll take a look at at the Wi-Fi router settings web page.
- Final, You’ll use the Google DNS server addresses within the DNS segment. DNS 1 server cope with is 8.8.8.8 and DNS 2 is 8.8.4.4.
8. Reset Community Settings
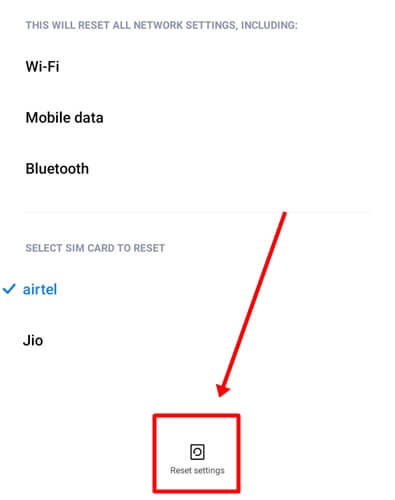
To unravel this Wi-Fi restricted connectivity error reset the community settings of the android smartphone. Resetting the community won’t delete knowledge out of your telephone excluding your community settings like WiFi, Bluetooth, and cell knowledge settings. We now have discussed the stairs underneath in the event you don’t understand how to do it.
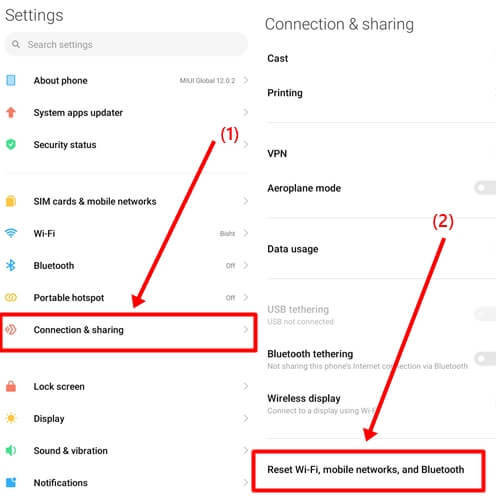
- Move on your telephone Settings.
- Click on on Connection & Sharing choice and faucet on Reset Wi-Fi, Cell Networks, and Bluetooth.
- Now click on on Reset Settings Button.
Conclusion
That’s fascinated about this newsletter. We now have coated the entire imaginable Android software answers to the Wi-Fi restricted connectivity factor. We are hoping that this sort of answers works for you.
If it doesn’t, please be at liberty to depart a remark explaining your downside intimately so we will be able to higher perceive your factor and provide the absolute best answer. If you happen to discovered this newsletter useful and informative, please proportion it with someone dealing with the similar factor.
Supply By means of https://techdator.web/wi-fi-showing-limited-connectivity-android/


